Welding can provide the foundation of a solid paycheck and a good living.
It can also be a needed skill for home repairs and other DIY projects.
It is a delicate form of manufacturing art for sure, but it can also provide you with the canvas you need to pursue something that you’re passionate about in life.
Laying down a perfect welding bead isn’t something that tends to happen overnight.
The costs of modern welding equipment, especially if you look at top-priced items, can seem intimidating and overwhelming.
Here’s the good news: the best welding equipment today for many home projects or entry-level commercial needs only costs a few hundred dollars.
Some of the best custom welding helmets cost more than some of the welders that you can purchase right now.
Better equipment, with longer duty cycles, will cost you more.
For most DIY projects or entry-level commercial needs, however, all of that stuff is going to be overkill.
You can expect to pay about $500 for a complete setup, including safety equipment that will allow you to weld mild steel that is up to ¼-inch thick.
Then you’re ready to tackle some of the welding projects that will help you to develop your skills, like the cart or shelf that you’ll need to hold your new welding equipment.
If you’re ready to get started in welding, then here is what you’re going to need to do.
Step #1: Choose Your Preferred Welding Method
There are different welding methods, or disciplines because one welding process will not work for every conceivable application.
This means you’ll need to consider the factors of the project before you begin welding so you can pursue the best possible welding method to meet your needs.
What are the factors that need to be considered?
- The thickness, type, and size of the metal that will need to be welded.
- How big the actual welding job happens to be.
- Whether the welding will occur outdoors or it will be indoors.
- What the weld needs to look like when the job is completed.
The most common form of welding in the United States is electric arc welding. This discipline uses a welding wire or some other electrode to partially melt the base metals that need to be fused together. When the metals cool down, then the two items will fuse together.
MIG welding is the usual choice in this area because wire-feed welding is easy to learn and can often be self-taught. Just pull the trigger on the welding gun and the wire will spin out from a continuous feed. At the same time, a shielding gas will protect the metal from environmental impurities, creating a clean bead very consistently.
Multiple disciplines exist and some do require extensive training. It all depends on what your needs happen to be. So choose your preferred welding method and you’ll be ready to get started.
Here’s a Pro Tip: It may be useful to take a class at your local community class or technical school. Many welding classes are held at night, 1-3 nights per week, and will introduce you to the finer skills of welding without breaking your budget. Even if you prefer to figure things out on your own, it is easier to be a self-taught welder with some foundational skills in your back pocket.
Step #2: Pick Out Your Welder
If you’re just getting started with welding, then the biggest expense is most likely going to be the actual welder. Cheap welders can sometimes be found for less than $100 today, but they can also make it difficult to learn new skills. A good compromise is to look for a MIG welder that has a motor-driven wire spool. This will allow you to create a bead by contacting the wire to metal thanks to the arc that is produced.
A welder that can work on a standard household current is often good enough for most home-based DIY projects.
You’ll be able to find a welder which meets those specifications for $300-$750.
If you want a welder that can support your growing skills, then consider a multi-function welder instead of a discipline-specific welder.
This will allow you to MIG-weld, TIG-weld, and stick-weld, though it may cost upwards of $1,000 to obtain this type of welder.
On the other hand, a multi-function welder is like purchasing three welders at once, so it does provide some long-term cost savings.
Some multi-function welders even include a plasma cutting torch as one of their primary features.
Here’s a Pro Tip: Make sure that you keep your work lead clean as you get started with your welding.
That’s the electric cable that has a clamp on the end of it.
It will attach to your base metal, completing the electrical circuit that needs to be formed so an arc can be created. If there is any paint, rust, or dirt between the clamp and the metal contact, then the quality of the weld is going to suffer.
Step #3: Grab Your Welding Accessories
For most beginning welders, it is important to have a good supply of welding wire on hand so that skill practice can happen.
Uses a thin welding wire on thin sheet metal for best results, then expands the diameter of the welding wire as the thickness of the metal increases. You should have a minimum of two different wire diameters available to you.
If you’re not sure which welding wire diameter is needed, your welder will tell you what it takes. Look for a flip-up panel on the welder or access the equipment specifics in the owner’s manual to make sure you’re making a correct purchase.
You’ll also need to have the right shielding gas for your welder. Reusable gas tanks are available from your local welding supplier. You can also grab this welding tank right now if you don’t have a local supplier: Click here to view the price on Amazon and get the best deal.
If you do purchase your welding gas tank online, you’ll still need to find a local provider to fill and then refill the tank. Some national retailers offer this service, including Tractor Supply Company.
PSI is important to consider with the type of torch you’ll be using. Most DIY projects require a PSI of 15-25. Gas mixtures can vary as well, but clean welds come from a 75/25 mixture of carbon dioxide and argon.
You’ll also want to have a welding cart available to you, especially if you’re using a wire-feed welder. If you don’t feel like making your own cart, this arc welding cart with tank storage is a solid and affordable option to consider: Click here to view the price on Amazon and get the best deal.
A carbide scribe or an awl is useful to mark your cut lines on the materials that you’ll be fusing together. This pocket scribe is a highly-rated option at a very competitive price: Click here to view the price on Amazon and get the best deal.
You may also wish to invest in a right-angle grinder. This tool will help you to flatten your welds, prepare your surfaces, and give you the option for beveling or grinding to complete the next project. This model from DeWalt provides excellent versatility: Click here to view the price on Amazon and get the best deal.
It is often necessary to secure your joints when welding as well. This means it is useful to have either a miter clamp or a magnet square close by. This pliers/clamp kit is a good value purchase to consider: Click here to view the price on Amazon and get the best deal.
Welding will often produce slag and spatter. It comes with the territory when you’re working with heated metals. Once that hot metal cools down, cleaning up after welding can be an extremely frustrating experience. Owning a chipping hammer can help to make the work go a little faster: Click here to view the price on Amazon and get the best deal.
If there is just one accessory you can purchase besides the welding wire you need, then it should be a set of welding pliers. These pliers will help you be able to trim your welding wire and remove any splatter that occurs on the nozzle. This option from Hobart is affordable and provides users with 12-function support: Click here to view the price on Amazon and get the best deal.
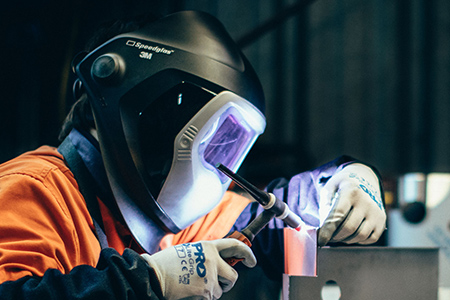
Step #4: Grab a Good Welding Helmet
You can find a basic flip helmet for welding available online today for about $15. Although this cheap equipment gets the basics right and can protect your face and eyes from the process of welding, it isn’t the best protection that is on the market today.
Let’s face it: the light from arc-welding is very bright.
Prolonged exposure to that light will increase the risk of vision damage. It is even possible to burn your eyes from welding without the right level of darkening protection from your helmet.
That is why one of the best auto-darkening welding helmets is an investment that should be considered.
New technologies allow these helmets to protect your eyes from the harmful light emissions that welding can project by automatically darkening a clear lens to the appropriate protective shade in milliseconds.
This is because of LCD technology that has been incorporated into the viewing glass.
Look for auto-dark helmets that allow you to personalize your settings so you get the best possible experience and protection in this area.
Step #5: Get Your Weld Prepared
When you’re getting ready to weld, you don’t just slap a couple of pieces of metal together and get to work.
You need to prepare your metals so that they are ready to accept the welding process.
Different welding disciplines have varying levels of readiness that are required of the metal before you can get to work.
In general terms, however, you’ll want to remove any oil or dirt that may be on the metal so your bead can be as clean as possible. You can do this by using acetone with a wire brush.
Then add any cut lines you may need with your carbide scribe. Complete the cut with your plasma torch, cutoff wheel, or a metal-bladed hacksaw.
You may also need to clean the edges of your metals that will be joined together. Only grind the edges that you intend to join. It’s a good idea to create a 45-degree angle on your edges if possible as this will give you space for any filler materials that may be needed to give your joint and bead firmer structural integrity.
Then position your metals so that they can be on the same plane when you are welding. This is where your miter clamp or a magnet square will help greatly.
Step #6: Get Yourself Prepared
Once you have all your items in place, then it is time to double-check yourself so that you are prepared to begin the welding process.
When you are welding, the molten metals you create have the potential to spark a fire.
Make sure that you have one of the best welding jackets on, or at the very least, a welding apron. Leather welding gloves are another essential item that you’ll want to have around.
Don’t forget to put on your helmet before you begin to work either. Although it may seem like common sense, it is one of the most frequently forgotten welding safety equipment items.
If you’re looking to save some cash, a 100% cotton long-sleeve work shirt can work as a replacement for a welding jacket. Carhartt makes several options that qualify.
You’ll also want welding boots or work boots on your feet. Most sneakers do not provide the right amount of protection should molten metal contact your feet during your work. It is also necessary to remove any jewelry from your neck or your wrists. For those with a wedding ring, you may wish to remove it if you can do so safely.
For the grinding process, a pair of safety glasses or a full-face shield is also necessary if you don’t want to wear your welding helmet. These NoCry safety glasses offer anti-scratch and anti-fog protection, as well as UV400 protection, so your grinding can happen safely indoors or outdoors.
Step #7: Layer Your Weld
When you do start welding, it is important to begin layering it. Think of welding like you are playing golf.
The best golf swings tend to minimize movement, but offer motions that are fluid. You can then create the muscle memory that is needed to repeat those fluid motions time and time again.
Holding the welding gun in two hands whenever possible will give you some extra stability when you make a pass. It’s also a good idea to do a dry run with your welding equipment to ensure that you are comfortable with your current positioning.
If you have steady hands, you’ll create a better weld.
Then tack weld your items first. You want just enough to connect the base materials at the joint.
Once the tack is placed, you can lay your final bead.
You’ll want to keep the gun at a 75-degree angle to the base and move slowly in the reverse direction of your dominant hand.
- If you are left-handed, then you will want to lay down your bead from right-to-left.
- If you are right-handed, then you will want to lay down your bead from left-to-right.
Focus on the bead. Beginners tend to focus on the brightness of the arc and this creates a poor final bead. It’s helpful to look at the edge of the puddle being made with the bead. Then, when you reach the end of your weld, pull the wire back from the metal and let your work cool down.
Step #8: Grind Your Weld
There are times when you don’t care what your weld looks like. If that’s the case, you can skip this final step.
If you do wish to improve the look of your weld after it has cooled, then you can flush-grind it if you wish. A 36-grit wheel on your right-angle grinder can do so easily for you. Go slowly over the weld, using light passes. If you grind too hard, you may go through your weld and force yourself to start over.
You can tell if you are grinding correctly based on the color of the sparks that you are seeing come off your weld.
- Orange sparks indicate that you are pressing the right-angle grinder with the correct amount of force.
- Blue sparks indicate that you are pushing too hard and need to lighten up just a bit.
- White sparks indicate that you’re creating more heat with the grinding, which may change the structure of your weld. You’ll need to stop and take a closer look at your work to make sure it hasn’t been damaged.
Once you’ve finished grinding, you can then shape and finish at your luxury.
In Conclusion
Welding might seem like a complex and complicated skill to learn, but it can be fairly easy to self-teach yourself many of the necessary skills that are required for a good, clean bead.
With the right equipment and protective items, you can be up and welding in no time at all.
Keep these steps in mind as you begin your pursuit of a new welding skill.
Whether you’re trying to create a new career for yourself or you just have a number of projects at home that you want to complete, you’ll be able to support your welding quite effectively.